|
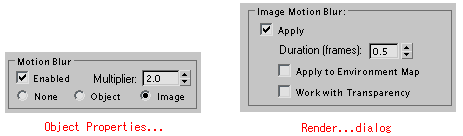
Motion Blur
次の5通りのモーションブラーがある。
A. Multi-Pass Effect (カメラ)
B. Image Motion Blur
C. Object Motion Blur
D. Scene Motion Blur (ビデオポスト)
E. Render EffectsのMotion Blur
結論から言うなら、多くの場合、Multi-PassとImage Motion Blurを組み合わせると自然な仕上がりとなる。
単独での使用の場合、Image Motion BlurないしRender EffectsのMotion
BlurあるいはVideo PostのScene Motion Blurで良好な結果が得られ、レンダリング時間も早い。
下の画像は今回のテストに用いたもので、Motion Blurをかけない状態のもの。
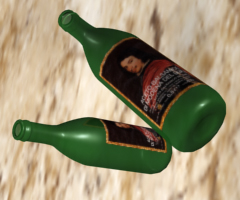
テスト画像
いずれのボトルも20フレームのアニメーションの中で落下するよう設定している。 テスト画像は中間の10フレーム目のもの。
異なる速度におけるブラーの効果を試験するため、手前のボトルは落下速度を遅く設定し、後ろのボトルは早く設定し、なおかつ回転しながら落下するようにした。
A. Multi-Pass Effect (カメラ)
Total Passesに設定した回数だけシャッターを切り、モーションブラーを作成する。設定は各カメラのコントロールパネルで行う。
下のレンダリング結果に見られるように、After Effectsの時間/エコーのような結果になっている。

Multi-Passによるブラー
手前の移動速度の遅いボトルは比較的良好な結果が出ているが、後ろの速度の早いボトルはブラーが割れているのがわかる。
この画像の設定は以下の通り。Total Passes:で設定した5回分、ボトルがぶれているのがわかる。

Cameraのコントロールパネル
ヒント:
- 1. Video Postを使ってレンダリングすると、 Multi-Pass Effectはオミットされる。
- 先の画像に対し、次に述べるImage Motion Blurを加えると、ブラーがより自然になる。

Multi-PassとImage Motion Blurを同時に行った画像
B. Image Motion Blur
ポストプロセスによるモーションブラー。レンダリング時間は早いが、背景とのエッジが目立つ。
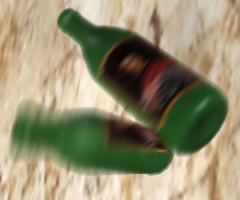
Image Motion Blurによるレンダリング
Image Motion Blurの設定は、オブジェクトのプロパティとRender...ダイアログ。上図の設定は以下の通り。マニュアルには、「Scene
Motion Blurより良好な結果が得られる」と書かれている。
ヒント:
- Image Motion Blurだけでは必ずしも良好な結果が得られない。Multi-Passと組み合わせると良い。
- Image Motion Blurと次に述べるObject Motion Blurは二者択一であり、同一のオブジェクトに同時に適用することはできない。
- Image Motion BlurはビデオポストのScene Motion Blurと併用できる。
- RenderダイアログのDurationを2に変更すると下のような画像になる。
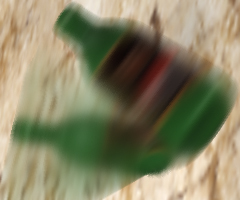
Durationを増やしたImage Motion Blur
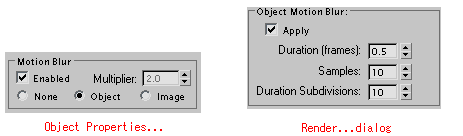
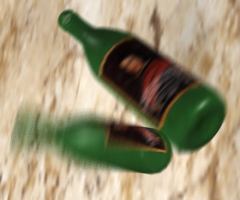
C. Object Motion Blur
背景との境界がやや目出つが、Image Motion Blurほど目立つものではない。

Object Motion Blur
Object Motion Blurの設定は、オブジェクトのプロパティとRender...ダイアログ。上図の画像の設定は以下の通り。
ヒント:
- Image Motion Blurよりレンダリングに時間がかかる。
- Image Motion BlurとObject Motion Blurは二者択一であり、同一のオブジェクトに同時に適用することはできない。
- Video Postと併用できる。
- 次の画像は、Object Motion BlurにMalti-Passを5のTotal
Effectでかけたもの。 背景となじんでいるが、ブラーは強調されている。
Multi-Passを併用したObject Motion Blur
D. Scene Motion Blur (ビデオポスト)
Video PostによるモーションブラーはScene Motion Blurと呼ばれている。Multi
PassとImage Motion Blurの中間のような結果が出る。
設定は、Scene Eventの以下のOptionsダイアログで行う。
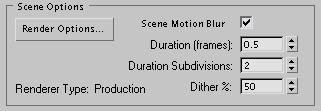
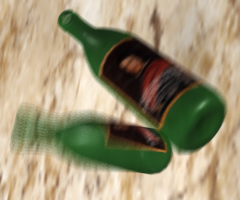
Scene Motion Blurによるレンダリング
上の画像では、Durationを12、Duration
Subdivisionsを10に設定している。
ヒント:
- Multi-Pass Effectは、Video Postと併用できない。
- Image Motion BlurとObject Motion Blurは、Video
Postと併用することが可能。
E. Render EffectsのMotion Blur
このモーションブラーは、Image Motion BlurをRender Effectsで扱うものである。ブラーをかけるObject
Properties...の設定がEnabled、Imageになっていなければならない。
|
